Incoming Erasmus+ & Exchange students - Nomination - Application
In this short user manual you learn how to work with our Erasmus+ & Exchange online nomination and application system. You will gain access to the system via a generated e-mail which will contain a link that will log you in directly to the system. You have a general overview of the system. This manual aims both at coordinators and students.
Nominations (Information for Coordinators)
Home page
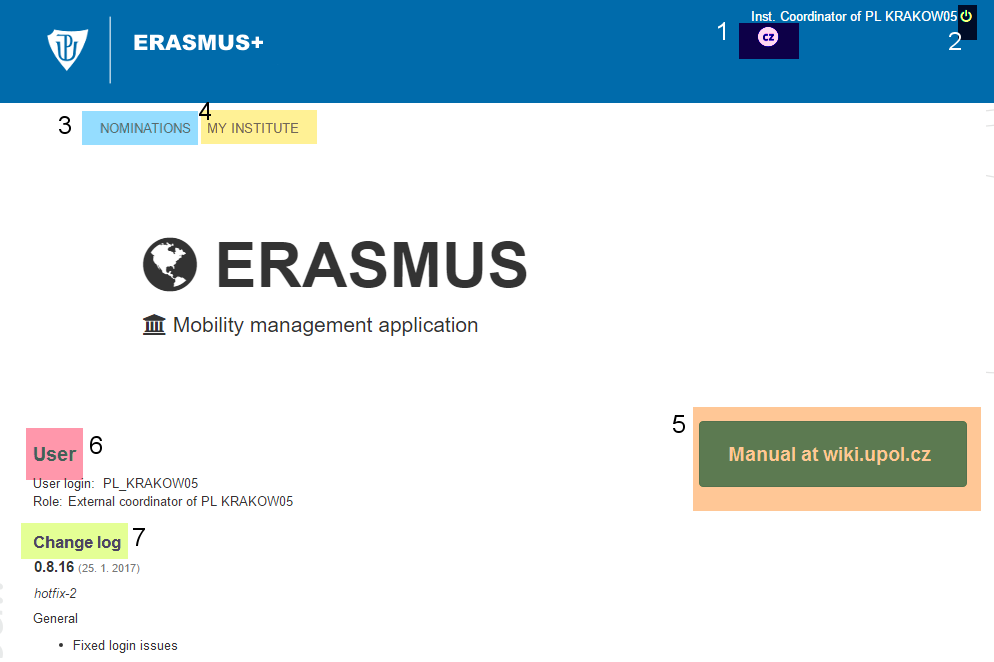
By clicking [1] you will change language of the system. By clicking [2] the switch button you will log out of the system. Clicking on the Nominations [3] you will be directed to Nominations page, where you will fill in basic nomination data of your students. To get to overview of your institution data, go to My institute [4]. Get to the manual by clicking the button [5]. There are your user information [6] on the main page as well as the system change log [7].
Nominations
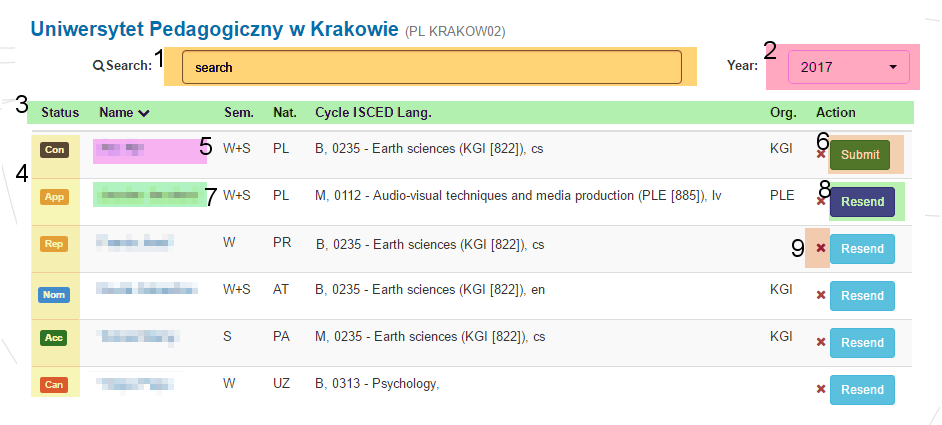
You can Search [1] among the already created nominations by typing student's name. The system will filter the list automatically. Also, for future reference, you can filter nominations through nomination years [2]. Furthermore, you can sort [3] the nominations either by state, name, semester, cycle, ISCED code or language.
There are several statuses [4] of the nominations:
- Concept- right after adding a nomination
- Nominated - after submitting the nomination (an information e-mail to the student is sent at the same time)
At this point the nomination part is successfully completed. The nomination stage changes into the application stage once the student receives an information e-mail with a link to access the application form.
Statuses of the application can be following:
- To Repair - if some data in the application need to be repaired (e.g. missing information, etc.)
- Accepted - student is accepted to studies
- Denied - student is not accepted to studies
- To Approve - once after submitting the application by student
- Cancelled - after student or the coordinator of the home institution withdraws the application
You can click on the name of the student to view detailed information of his/her nomination. There are two types of overviews of the information at the moment - there is a shortened overview for nominations in state Concept or Nominated [5] and full overview (application form) for the rest of the statuses [7].
You can submit [6] the nomination by clicking on the Submit button. The student will then receive an information e-mail with the link to the application form and details how to fill in the application form including deadlines. You can Resend the information e-mail [8] to your student again if necessary. You can add new person to nomination by clicking on Add nomination [8]. At the stage of Concept, if necessary, you can delete the nomination [9] by clicking on the cross button.
Add nomination
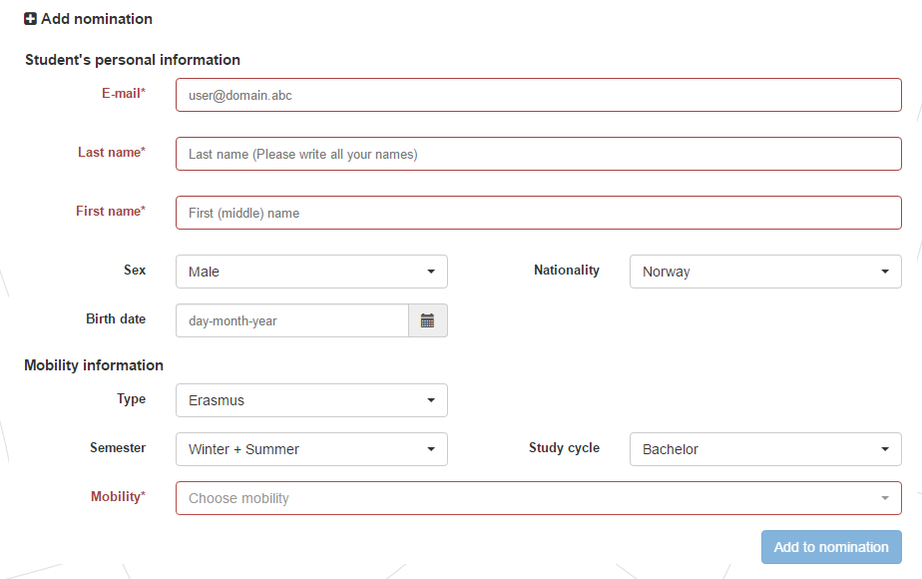
On the lower part of the Nominations page you can Add nominations of your students. Items marked by the asterisk [*] and red colour must be filled in. Nationality is selected automatically from the country of your university. You are able to change the nationality, if necessary. Please make sure that you provide correct nationality of the nominated student. It is an important criteria for the visa and non-visa student category. Then you should choose a mobility for the nominated student - you will see only the mobilities which are set for a chosen study cycle.
You can click the Add to nomination button once the form is completely filled in.
Nomination detail - status Concept
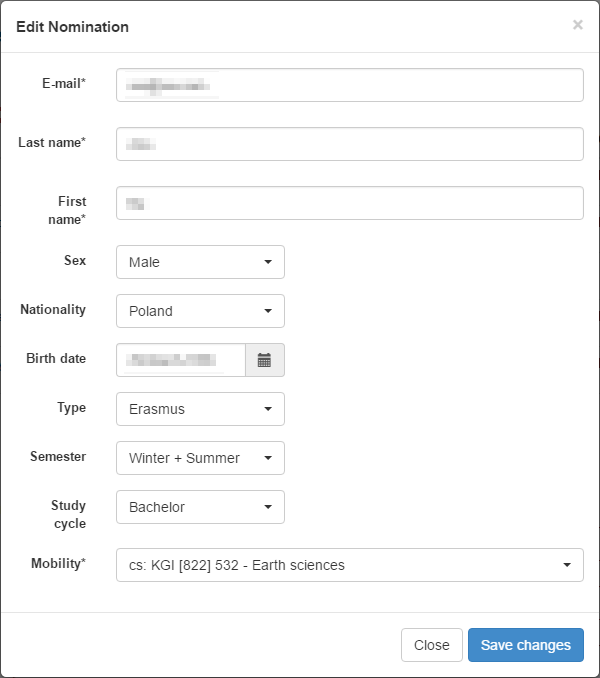
This is an overview of the detail of a nomination in the status Concept. It will be opened in a new modal window after clicking on the student's name. You can edit student's information there. Click the Save changes button once you have finished the editing.
My institute
Under my institute you will find details regarding fields of study from a selected department at Palacký University. It is only a general overview.
Application (Information for Students)
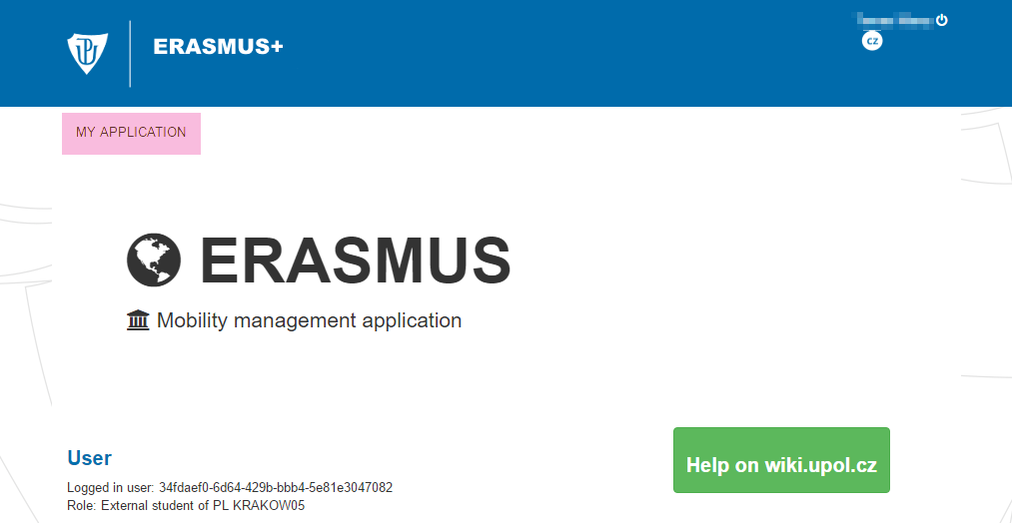
You will gain access to the Erasmus+ application through an e-mail. You will receive a link, you must click the link to log in to the application. Save the link, you will use it to gain access to your application. You gain general overview of the application. However, you will only get access to the My Application ,where you can manage your application.
The application is divided into three parts - Application [1], Course selection [2], Appendices [3] and Documents [4]. First we will take a look at the application, then course selection, the appendices and at last documents.
Application
Student must fill in all the information marked either with asterisk [*] or by colour red.
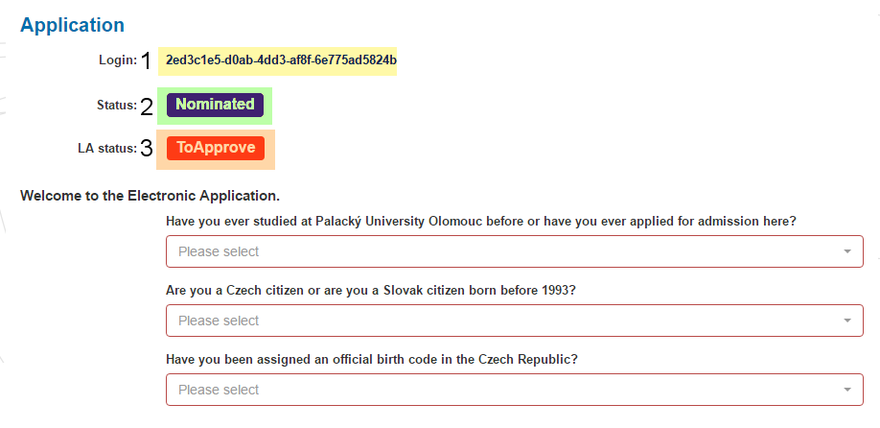
The link with hash-code [1] is a link to your profile at Erasmus+ application.Under no. [2] you can see the state of the nomination. Your application has several states [2]:
- Nomination - after submitting an information e-mail to the student
- To Approve - student approve all the information that are necessary for finishing the nomination - he/she must make sure that all the information are filled in properly - by clicking the To Approve button the student will send the nomination to the Palacký University
- To Repair - if there are information that have to be repaired
- Accepted - student is accepted to studies
- Denied - student is not accepted to studies
- Cancelled - after student withdraws his/hers nomination
The nomination will become the application form once you submit the nomination and an information email is sent to the student. Student should fill in the application form by himself/herself. Students can access the application form from their own profile via a link received in the information email.
LA status [3] marks status of student's learning agreement. It shows whether your learning agreement was accepted or it is to be approved or denied. You cannot approve or decline the agreement.
Mobility information
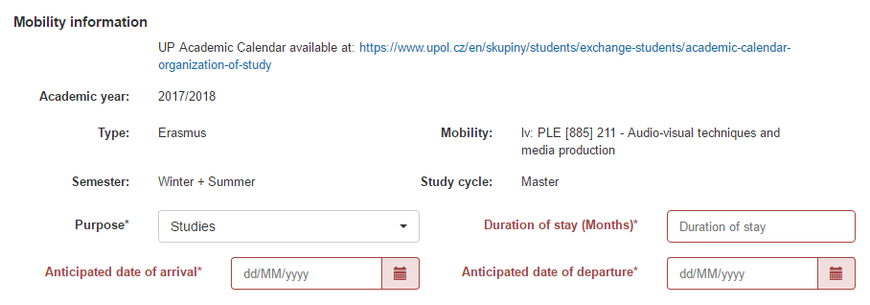
Check if the mobility is correct. If not, contact the administrator at your university. Then fill in all the required information.
Personal information
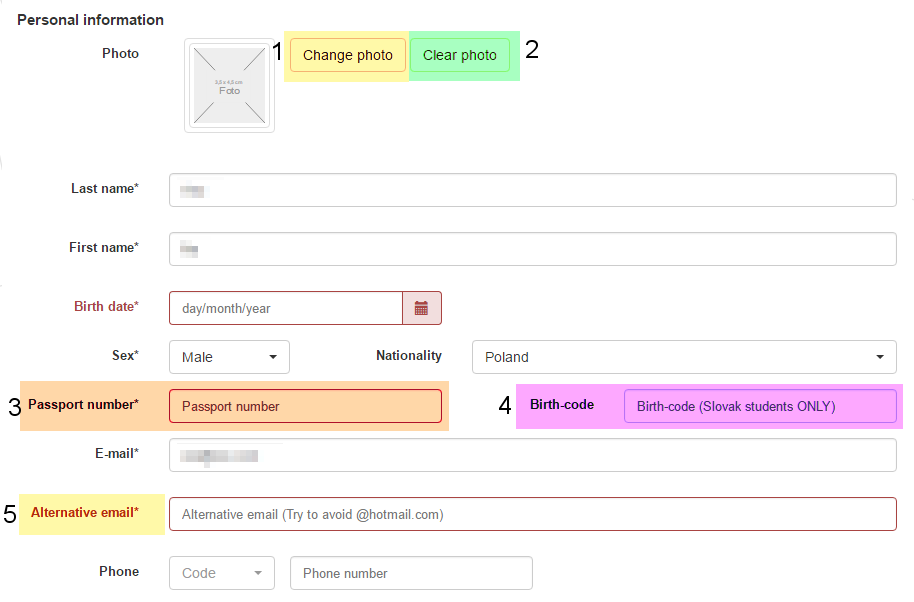
By clicking the Change photo [1] button you can upload your photo, by clicking the Clear photo [2] button you will erase the uploaded photo. You must fill in the Passport number [3]. Birth-code [4] text field is for students from Slovakia only! When entering the alternative email [5] try to avoid @hotmail.com e-mail addresses, they cause problems with e-mail notifications.
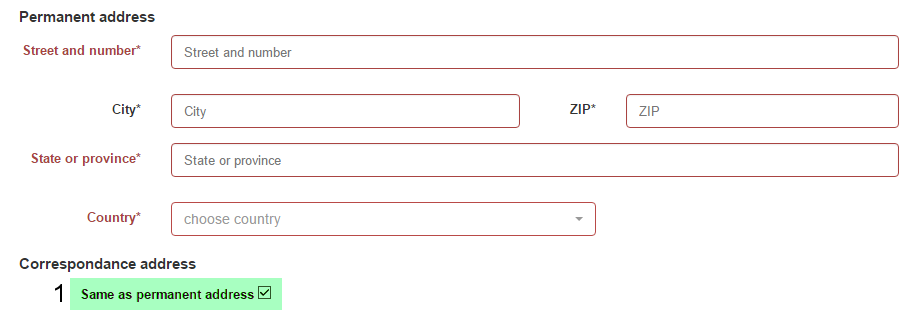
Permanent address
Please, fill in the permanent address fields. If student's correspondance address is different that his/her permanent address, uncheck the checkbox [1].
Emergency contact
Furthermore, a contact in case of any emergency must be filled in.
Special needs
Choose whether the student has any special needs we should know about in order to make his/hers stay as comfortable as possible.
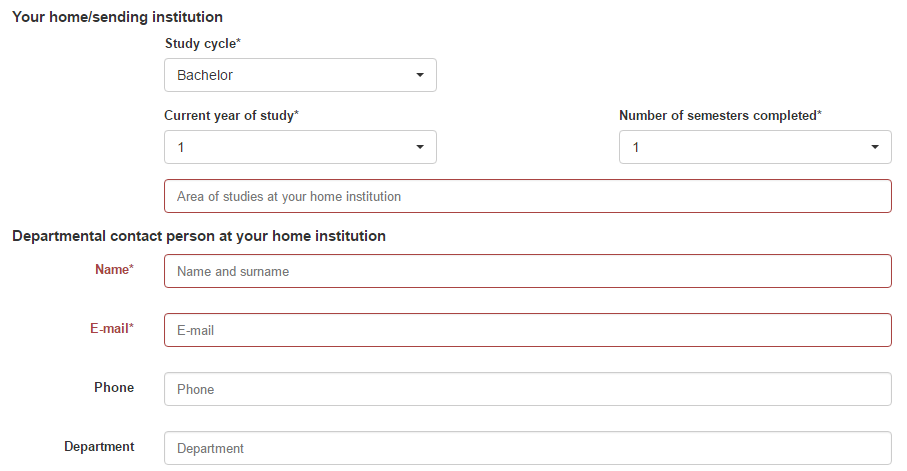
Home institution information
Fill in information regarding your home institutiton.
Language competence
Enter your language competence. Furthermore, enter the area of studies [1] the student wants to study at Palacký University.
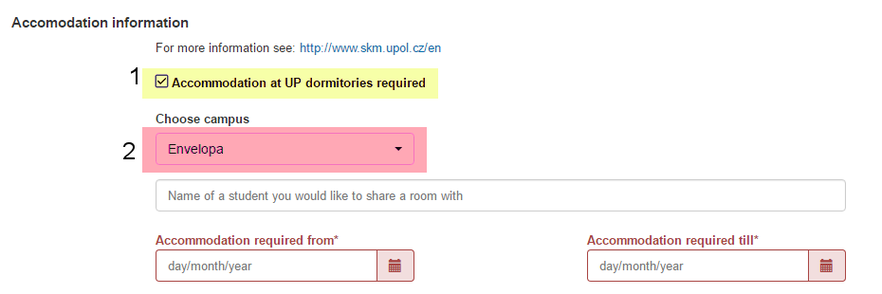
Accommodation information
Click the checkbox [1] if the you want to stay in Palacký University dormitory. If you click the checkbox, more information must be filled in, such as campus [2] the you would want to stay in.
Orientation week
Choose if you want to be a part of Orientation week and if you want to join Survival Czech course.
Save application / Submit / Withdraw
You must agree with terms and conditions or you will not be able to Save changes [1]. You should save changes in the Application part once all the required fields have been filled.
You can submit your application to Palacký University by clicking the Submit [2] button once you have added subject in the LA part and uploaded required appendices. You can also Withdraw [3] the application.
Correcting the application
If there are some information that needs to be corrected, you will be notified via e-mail. Follow the instructions from the e-mail and then click the Save changes [1] button. You will save the changes and you will notify the Palacký University coordinator that some changes were made. You can also Withdraw [2] your application.
Courses selection
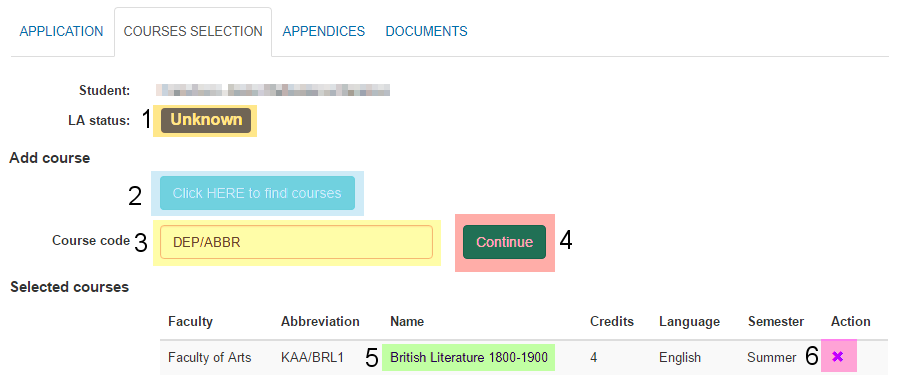
Add courses
Before you can send your application, you will need to add courses to your application. First, you can see the LA status [1]. Further, you will need to click the button [2] to get a list of courses taught at Palacký University. You have to enter the course code [3], then click the Continue button [4]. Then you must fill in the language of the course and semester (you have to fill in semester if you are going to study at Palacký University for both semesters). After you're done, click the Add course button. You will find course details by clicking the link in the name of the course [5]. You can delete the course from the list by clicking X [6].
You cannot edit your courses once the course selection is accepted. The courses will be sent for approval once you send the whole application. You will be notified via e-mail whether your course list was accepted or rejected. More on that further on.
Approved selection
Once your course list is accepted by a Palacký University coordinator you will be notified via e-mail. All the instructions for finishing the learning agreement are in the e-mail.
Correcting a rejected course list
You will be notified via e-mail whether your list of courses was rejected by a Palacký University coordinator. Follow the instructions from the e-mail. Once you make changes, a notify coordinator [1] button will appear. When you are finished with changes, click the button to notify coordinator.
Appendices
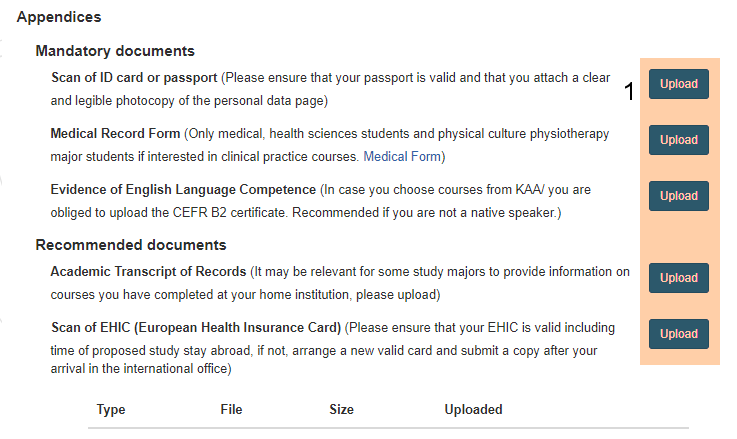
Further, you can upload [1] other documents requried. To upload the document, you must click the upload button. Also, you can download the uploaded documents by clicking the name of the file. You can also delete the files.
Documents
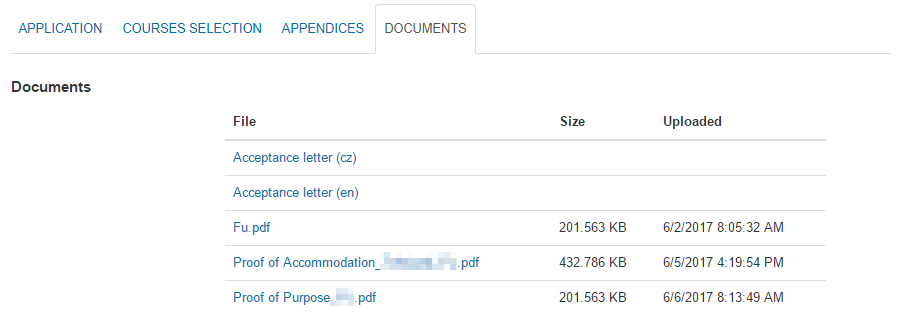
You can find various documents such as Acceptance letters, Proof of Accommodation or Proof of Purpose. These documents are uploaded by International Office of Palacký University.
Extension of stay
If you want to extend your stay at Palacký University, you can request an extension of your stay in the online application by clicking the Extension of stay [1] button.
A new window will open to fill in the dates [1] of a proposed extension period. Once you click the Save [2] button, a notification e-mail will be sent to Palacký University coordinators.
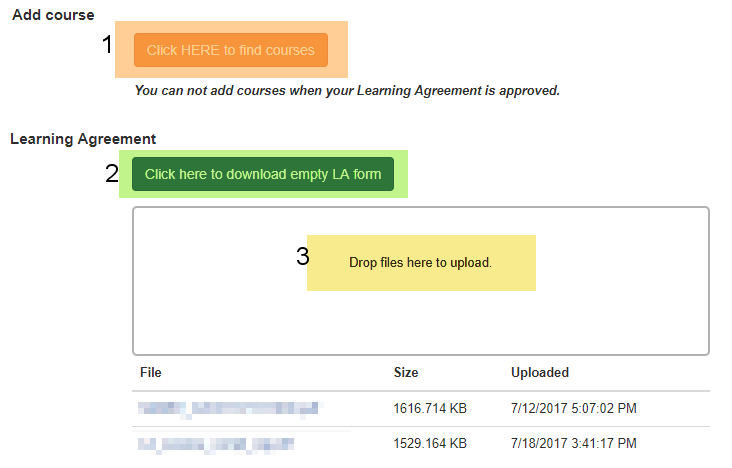
To prepare a new LA, go to your UP online application and download an empty form [2] in the LA section, print it out and fill it in (or vice versa), please note that this time (compared to the process before arrival) your LA will not be pre-filled, you will need to look up the courses first [1], make some notes and then fill in the form by yourself, then you ask your UP departmental or faculty coordinator for a signature and afterwards you send a scan of the signed document to your home institution requesting a confirmation and return of a complete document which you upload into your online application [3]. Upload a complete and signed LA document for the summer semester in the LA section. Please name the document LA_SUMMER.
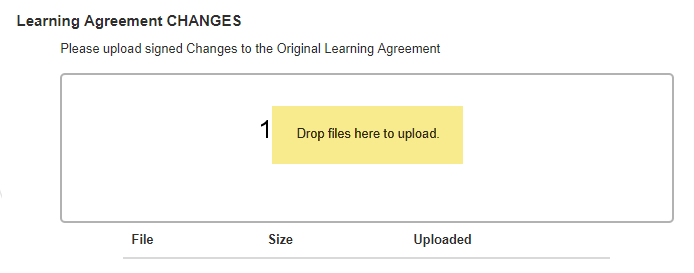
In case you now/later use the LA Changes name the document LA_SUMMER_CHANGES and always upload the documents to the respective box – LA or LA Changes [1]
Please note that your Learning Agreement for the summer semester should be uploaded in our system by 31. 1. 2018, the sooner you have it there, the sooner we confirm the extension of your stay. If there are some circumstances for which you need more time or if you need your extension to be confirmed before your LA complete i.e. signed by all 3 parties, let us know, serious reasons will be considered. If you are a visa student you may need to prolong your visa/residence permit. To prepare new visa support documents, get in touch with IRO/Z. Hamdanieh
After Arrival
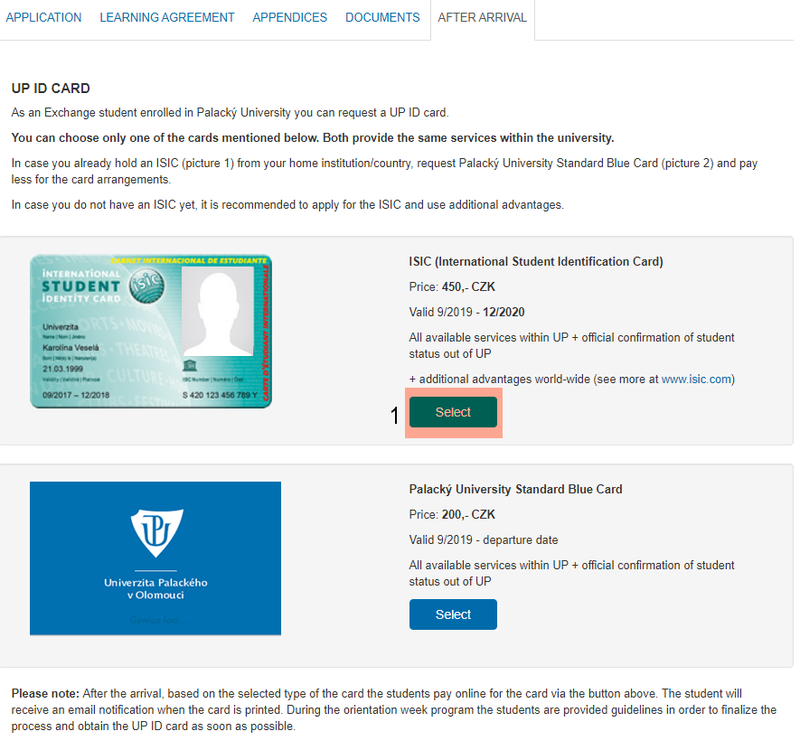
You will find a selection of Identification cards which are required at the Palacký University. You can choose either ISIC card or standard UP card. The ISIC card differs in various different advantages, more info at the ISIC card website, but there is extra fee for the ISIC licence. Standard UP card gives you access to buildings, library, catering. You can select the card by clicking the Select [1] button.
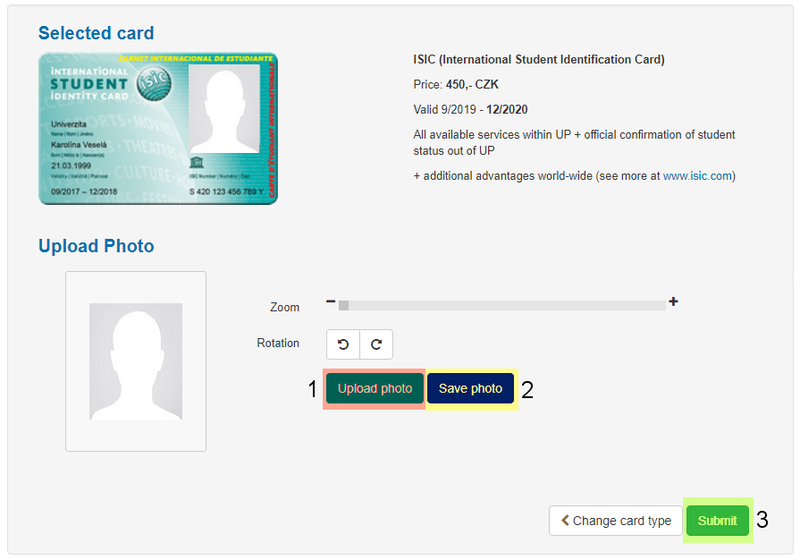
When you select your card, you must upload your photo first. Upload [1] a clear photo of yourself, the app will recognize if the photo is not in a proper format or it does not have proper quality. You must Save photo [2] after uploading the photo. Then click the Submit [3] button to submit your request.
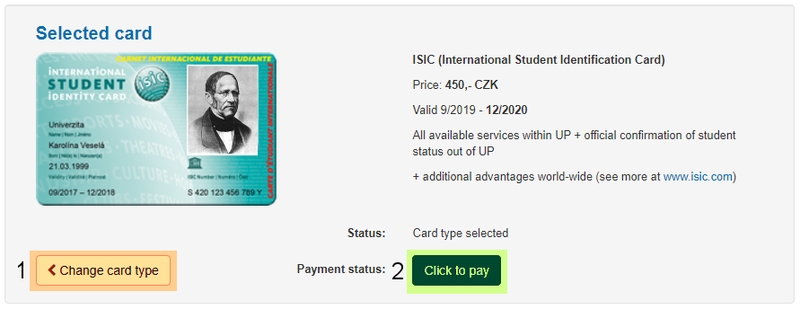
If you want to change [1] the type of the card, you can do so before paying the fee for the card. If you want to, you can pay [2] the fee at the payment gate via your credit/debit card.
