Pripojeni VPN pro Android/en: Porovnání verzí
(Založena nová stránka s textem „You can find all the basic, necessary steps, which must be done before you can connect to UP VPN network, at page with Speciální:MyLanguage/Pristup k p…“) |
Bez shrnutí editace |
||
| (Není zobrazeno 33 mezilehlých verzí od stejného uživatele.) | |||
| Řádek 2: | Řádek 2: | ||
You can find all the basic, necessary steps, which must be done before you can connect to UP VPN network, at page with [[Speciální:MyLanguage/Pristup k pocitacove siti|'''all the basic information regarding UP network''']]. Please, continue only after finishing all the steps, or you will be unable to connect to the VPN properly. So, how to we set up the VPN? | You can find all the basic, necessary steps, which must be done before you can connect to UP VPN network, at page with [[Speciální:MyLanguage/Pristup k pocitacove siti|'''all the basic information regarding UP network''']]. Please, continue only after finishing all the steps, or you will be unable to connect to the VPN properly. So, how to we set up the VPN? | ||
'''Before you set up a VPN connection, make sure that you have set up a password for VPN. Password to VPN or Eduroam is different one than a password to your Portal account. Follow the [[Speciální:MyLanguage/Navod_na_zmenu_hesla|password change manual here]].''' | |||
=== Step 1 - Settings === | |||
Choose option '''More settings''' in Settings. | |||
[[File:Vpn android en 01.png|center|320x535px|Vpn android en 01.png]] | |||
=== Step 2 - VPN === | |||
Choose '''VPN''' option in ''Wireless and networks''. | |||
[[File:Vpn android en 02.png|center|320x535px|Vpn android en 02.png]] | |||
=== Step 3 - Add Network === | |||
Choose the only option: '''Add VPN network'''. | |||
[[File:Vpn android en 03.png|center|320x535px|Vpn android en 03.png]] | |||
=== Step 4 - Setup === | |||
Name the network '''UPOL''', choose '''PPTP''' as the ''Type'' of the network and enter the ''Server address'' <u>'''158.194.254.162'''</u> (from 1.4.2025 address 158.194.254.166 is temporarily unavailable). Check out the '''PPP encryption''' and tap on '''Show advanced options'' where you should enter the following DNS server address: <u>'''159.194.244.2'''</u> Once you've entered all the information, click Save. | |||
[[File:Vpn android en 04.png|center|320x535px|Vpn android en 04.png]] | |||
=== Step 5 - Login details === | |||
Enter your login, which is your Portal ID and a password you've set up in Portal for WiFi and VPN connection. Then click Connect. | |||
[[File:Vpn android en 05.png|center|320x535px|Vpn android en 05.png]] | |||
=== Step 6 - Logging out === | |||
You can see a key icon in the upper-left corner meaning you are now connected to the university VPN network. How can you log out? Swipe down from the context menu. | |||
[[File:Vpn android en 06.png|center|320x535px|Vpn android en 06.png]] | |||
=== Step 7 - Activated Connection === | |||
Here you can see the activated VPN connection. Click on the connection button. | |||
[[File:Vpn android en 07.png|center|320x535px|Vpn android en 07.png]] | |||
=== Step 8 - Logout === | |||
[[File:Vpn android 08.png|center|320x535px|Vpn android 08.png]] | New window opens up. It shows duration of your VPN connection and amount of sent and received data. Most importantly, there is the '''Disconnect''' button. | ||
[[Category: | |||
[[File:Vpn android en 08.png|center|320x535px|Vpn android en 08.png]] | |||
[[Category:Information Technology]][[Category:Computer Network]][[Category:Manuals]][[Category:Manuals for connecting to VPN network]] | |||
Aktuální verze z 1. 4. 2025, 09:02
You can find all the basic, necessary steps, which must be done before you can connect to UP VPN network, at page with all the basic information regarding UP network. Please, continue only after finishing all the steps, or you will be unable to connect to the VPN properly. So, how to we set up the VPN?
Before you set up a VPN connection, make sure that you have set up a password for VPN. Password to VPN or Eduroam is different one than a password to your Portal account. Follow the password change manual here.
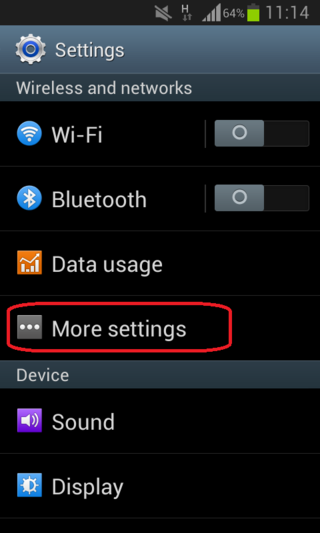
Step 1 - Settings
Choose option More settings in Settings.
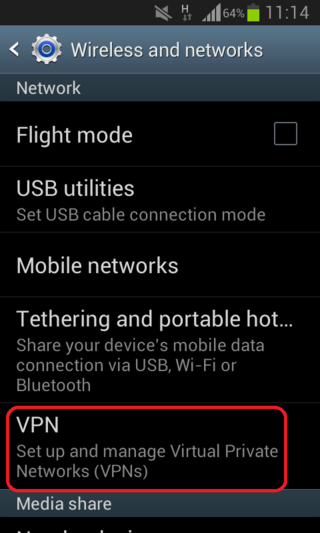
Step 2 - VPN
Choose VPN option in Wireless and networks.
Step 3 - Add Network
Choose the only option: Add VPN network.
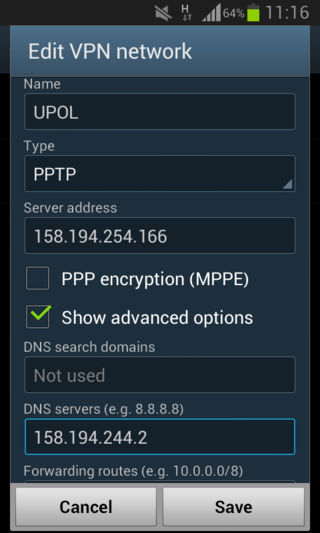
Step 4 - Setup
Name the network UPOL', choose PPTP as the Type of the network and enter the Server address 158.194.254.162 (from 1.4.2025 address 158.194.254.166 is temporarily unavailable). Check out the PPP encryption and tap on Show advanced options where you should enter the following DNS server address: 159.194.244.2 Once you've entered all the information, click Save.
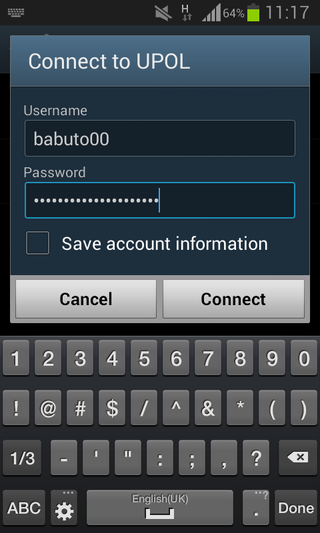
Step 5 - Login details
Enter your login, which is your Portal ID and a password you've set up in Portal for WiFi and VPN connection. Then click Connect.
Step 6 - Logging out
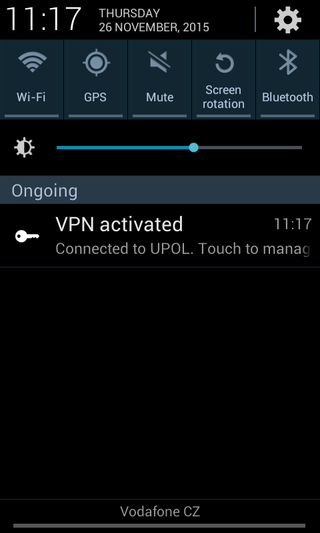
You can see a key icon in the upper-left corner meaning you are now connected to the university VPN network. How can you log out? Swipe down from the context menu.
Step 7 - Activated Connection
Here you can see the activated VPN connection. Click on the connection button.
Step 8 - Logout
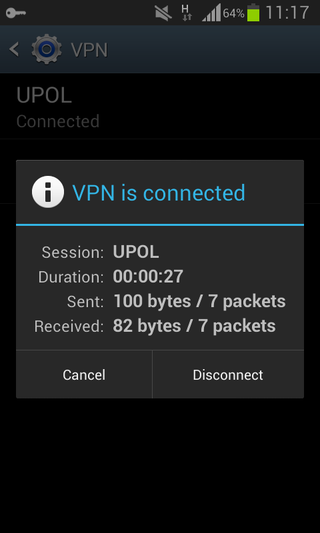
New window opens up. It shows duration of your VPN connection and amount of sent and received data. Most importantly, there is the Disconnect button.
