WiFi Eduroam pro MS Windows 7/en: Porovnání verzí
Bez shrnutí editace |
Bez shrnutí editace |
||
| (Není zobrazeno 106 mezilehlých verzí od 2 dalších uživatelů.) | |||
| Řádek 1: | Řádek 1: | ||
You can find all the basic | <languages></languages> You can find all the basic necessary steps, which must be done before you connect to eduroam WiFi network at page with '''[[Speciální:MyLanguage/Pristup k pocitacove siti|all the basic information regarding UP network.]]''' You should continue reading this manual only after you finish all the necessary steps. So, how do we set up the WiFi? | ||
== | == Connecting to the internet without experiencing any problems == | ||
=== Step 1 === | === Step 1 - Connection === | ||
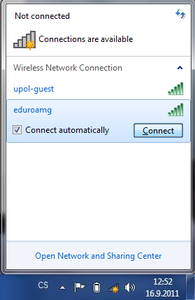
Click | Click the ''Wireless Connection'' button on your Start panel. If the ''eduroam'' network is available, choose it and click the '''Connect''' button. | ||
[[File:Windows 7 wifi en 01.png|center|200x300px|Windows 7 wifi en 01.png]] | [[File:Windows 7 wifi en 01.png|center|200x300px|Windows 7 wifi en 01.png]] | ||
=== Step 2 === | === Step 2 - Login details === | ||
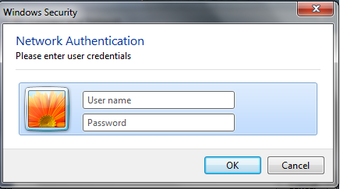
Enter your login details in the newly opened table. Your login is your '''[[Speciální:MyLanguage/PortalEn|Portal ID]] '''in '''PortalID@upol.cz ''' format and a password which you've set up in the Portal. | |||
''' | '''Student's ''' login will look like: ''20021111@upol.cz'', ''dvorak04@upol.cz''. Students who entered the university in adacemic year 2018/2019 will find their Portal ID in their online application form. Students can find it after in their Portal profile after logging in. If you forgot your Portal ID, please, contact Helpdesk at [https://helpdesk.upol.cz|'''helpdesk.upol.cz'''] - select ''Anonymous Request'' and choose ''Forgotten Login'' category. '''Employee's ''' user ID is the same as their Portal login: e.g. ''kocickov@upol.cz''. Employees should find their login details from the [[Speciální:MyLanguage/Spravci pocitacove site|computer network administrators]]. [[Navod_na_zmenu_hesla/en|('''For detailed password setup manual click here.''')]] | ||
[[File:Windows 7 wifi en 02.png|center|340x190px|Windows 7 wifi en 02.png]] | [[File:Windows 7 wifi en 02.png|center|340x190px|Windows 7 wifi en 02.png]] | ||
'''Notice: ''' Your eduroam login | '''Notice: ''' Your eduroam login is '''not your e-mail address'''. | ||
=== Step 3 === | === Step 3 - Logging in === | ||
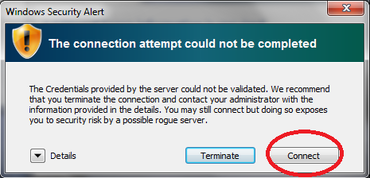
You might see certificate notification, click | You might see a certificate notification, click the '''Connect''' button. If everything is set up perfectly, you should be connected to the WiFi. | ||
Having trouble connecting to the network? Continue reading this manual to find out what to do. | Having trouble connecting to the network? Continue reading this manual to find out what to do. | ||
| Řádek 29: | Řádek 29: | ||
== Experiencing problems while connecting to the internet == | == Experiencing problems while connecting to the internet == | ||
You can overcome all the | You can overcome all the problems regarding internet connection in a few steps. You should not experience any issues while connecting to the UP network afterwards. | ||
=== Step 1 === | === Step 1 - Network and sharing center === | ||
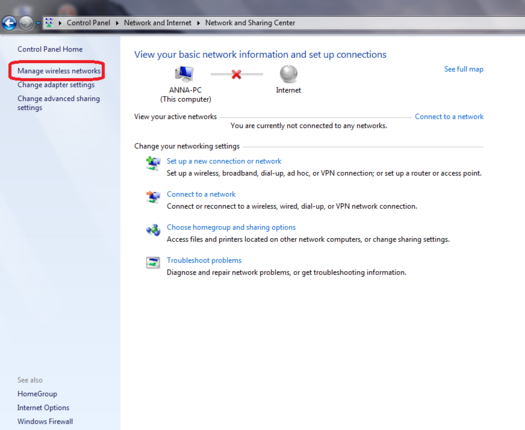
Right-click the wireless connection button and choose ''Network and sharing center''. When a new window opens up choose option '''Manage wireless networks'''. | Right-click the wireless connection button and choose ''Network and sharing center''. When a new window opens up choose option '''Manage wireless networks'''. | ||
| Řádek 37: | Řádek 37: | ||
'''[[File:Windows 7 wifi en 04.png|center|570x430px|Windows 7 wifi en 04.png]]''' | '''[[File:Windows 7 wifi en 04.png|center|570x430px|Windows 7 wifi en 04.png]]''' | ||
=== Step 2 === | === Step 2 - Add the network === | ||
You can see all the wireless networks you have already set up before. If there already is an '''eduroam''' network, delete it as it might cause | You can see all the wireless networks you have already set up before in this folder. If there already is an '''eduroam''' network, delete it as it might cause connection problems. Then click the '''Add''' button. | ||
[[File:Windows 7 wifi en 05.png|center|570x430px|Windows 7 wifi en 05.png]] | [[File:Windows 7 wifi en 05.png|center|570x430px|Windows 7 wifi en 05.png]] | ||
=== Step 3 === | === Step 3 - Create a network profile === | ||
''Manually connect to a wireless network'' | ''Manually connect to a wireless network'' window opens up. Choose '''Manually create a network profile'' option.''' | ||
[[File:Windows 7 wifi 06.png|center|570x430px|Windows 7 wifi en 06.png]] | [[File:Windows 7 wifi en 06.png|center|570x430px|Windows 7 wifi en 06.png]] | ||
=== Step 4 === | === Step 4 - Add information === | ||
Enter the information according to the following image, then click ''Next''. | |||
[[File:Windows 7 wifi en 07.png|center|570x430px|Windows 7 wifi en 07.png]] | [[File:Windows 7 wifi en 07.png|center|570x430px|Windows 7 wifi en 07.png]] | ||
=== Step 5 === | === Step 5 - Change of settings === | ||
You have successfully added the ''eduroam'' network to your computer. However, we are ''not done yet''. Click | You have successfully added the ''eduroam'' network to your computer. However, we are ''not done yet''. Click the '''Change connection settings''' button. | ||
[[File:Windows 7 wifi en 08.png|center|570x430px|Windows 7 wifi en 08.png]] | [[File:Windows 7 wifi en 08.png|center|570x430px|Windows 7 wifi en 08.png]] | ||
=== Step 6 === | === Step 6 - "Connection" tab === | ||
Again, new window | Again, new window opens up. Set everything according to the following picture in the ''Connection'' tab. '''Do not close''' the window after you're finished and move on to ''step 7'' | ||
[[File:Windows 7 wifi en 09.png|center|365x470px|Windows 7 wifi en 09.png]] | [[File:Windows 7 wifi en 09.png|center|365x470px|Windows 7 wifi en 09.png]] | ||
=== Step 7 === | === Step 7 - "Security" tab === | ||
Switch to the ''Security'' tab and click | Switch to the ''Security'' tab and click the '''Settings'''. | ||
[[File:Windows 7 wifi en 10.png|center|Windows 7 wifi en 10.png]] | [[File:Windows 7 wifi en 10.png|center|Windows 7 wifi en 10.png]] | ||
=== Step 8 === | === Step 8 - Certificate settings === | ||
Enable '''Validate server certificate''' and then enable '''Connect to these servers''' and enter ''' | Enable '''Validate server certificate''' option and then enable '''Connect to these servers''' and enter '''radius1.upol.cz;radius2.upol.cz''' into the box. | ||
Then choose the '''AddTrust External CA Root''' or '''UTN-USERFirst-Hardware''' in ''Trusted Boot Certification Authorities''. Once you have done this, click | Then choose the '''AddTrust External CA Root''' or '''UTN-USERFirst-Hardware''' in ''Trusted Boot Certification Authorities''. Once you have done this, click the '''Configure...''' button. | ||
'''[[File:Windows 7 wifi en 11.png|center|Windows 7 wifi en | '''[[File:Windows 7 wifi en 11.png|center|Windows 7 wifi en 11.png]]''' | ||
=== Step 9 === | === Step 9 - Disable the option === | ||
Disable '''Automatically use my Windows logon name and password (and domain if any)'''. | Disable '''Automatically use my Windows logon name and password (and domain if any)'''. | ||
[[File:Windows 7 wifi en 12.png|center|315x185px|Windows 7 wifi en 12.png]] | |||
=== Step 10 - Login setup === | |||
Now we are at the last part of the setup process. You have to setup your login and password to the WiFi. Click the Advanced settings button. | |||
[[File: | [[File:Windows7 wifi en 13.png|center|Windows7 wifi en 13.png]] | ||
Check the Specify authentication mode and choose User Authentication. | |||
[[File:Windows7 wifi en 14.png|center|Windows7 wifi en 14.png]] | |||
Enter your login details in the window and then click the OK button. | |||
Close all the opened windows by clicking the '''OK''' button. Now you should be connected to 'eduroam' university network. It was a piece of cake, wasn't it? | |||
== What should I do if I still have trouble connecting to the internet? == | == What should I do if I still have trouble connecting to the internet? == | ||
There is help available if you have issues with network connection. | |||
Please, [[Spravci_pocitacove_site/en|'''contact your computer network administrator''']]. | |||
Aktuální verze z 21. 3. 2024, 07:06
You can find all the basic necessary steps, which must be done before you connect to eduroam WiFi network at page with all the basic information regarding UP network. You should continue reading this manual only after you finish all the necessary steps. So, how do we set up the WiFi?
Connecting to the internet without experiencing any problems
Step 1 - Connection
Click the Wireless Connection button on your Start panel. If the eduroam network is available, choose it and click the Connect button.
Step 2 - Login details
Enter your login details in the newly opened table. Your login is your Portal ID in PortalID@upol.cz format and a password which you've set up in the Portal.
Student's login will look like: 20021111@upol.cz, dvorak04@upol.cz. Students who entered the university in adacemic year 2018/2019 will find their Portal ID in their online application form. Students can find it after in their Portal profile after logging in. If you forgot your Portal ID, please, contact Helpdesk at helpdesk.upol.cz - select Anonymous Request and choose Forgotten Login category. Employee's user ID is the same as their Portal login: e.g. kocickov@upol.cz. Employees should find their login details from the computer network administrators. (For detailed password setup manual click here.)
Notice: Your eduroam login is not your e-mail address.
Step 3 - Logging in
You might see a certificate notification, click the Connect button. If everything is set up perfectly, you should be connected to the WiFi.
Having trouble connecting to the network? Continue reading this manual to find out what to do.
Experiencing problems while connecting to the internet
You can overcome all the problems regarding internet connection in a few steps. You should not experience any issues while connecting to the UP network afterwards.
Step 1 - Network and sharing center
Right-click the wireless connection button and choose Network and sharing center. When a new window opens up choose option Manage wireless networks.
Step 2 - Add the network
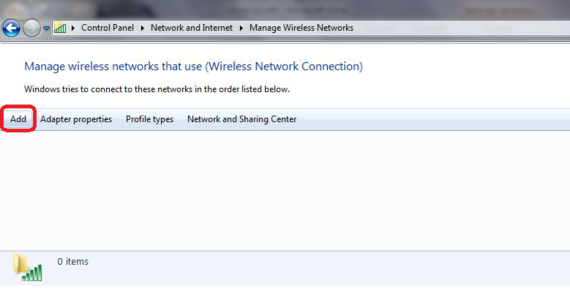
You can see all the wireless networks you have already set up before in this folder. If there already is an eduroam network, delete it as it might cause connection problems. Then click the Add button.
Step 3 - Create a network profile
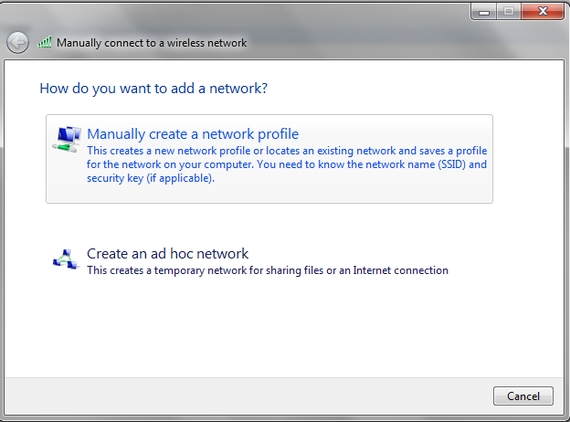
Manually connect to a wireless network window opens up. Choose Manually create a network profile option.
Step 4 - Add information
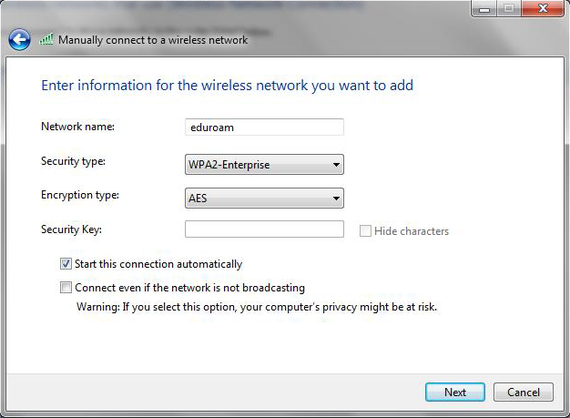
Enter the information according to the following image, then click Next.
Step 5 - Change of settings
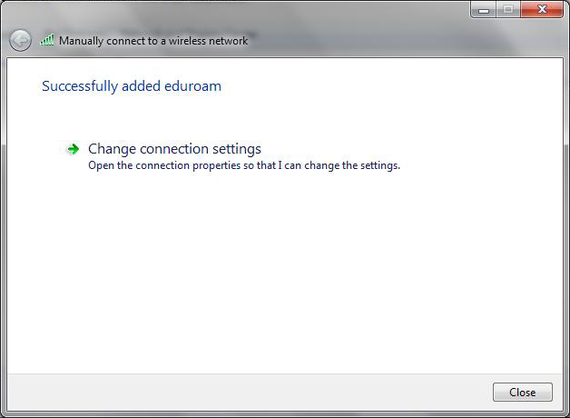
You have successfully added the eduroam network to your computer. However, we are not done yet. Click the Change connection settings button.
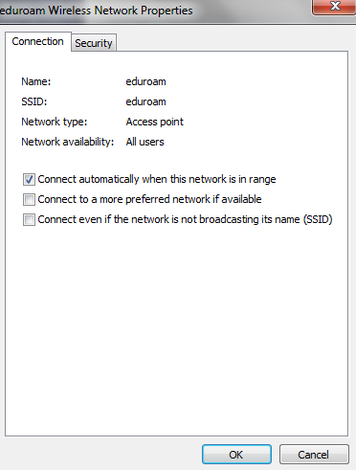
Step 6 - "Connection" tab
Again, new window opens up. Set everything according to the following picture in the Connection tab. Do not close the window after you're finished and move on to step 7
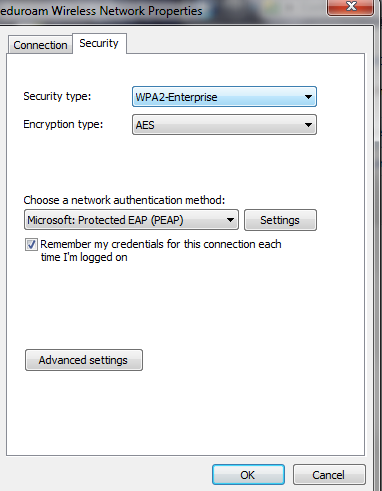
Step 7 - "Security" tab
Switch to the Security tab and click the Settings.
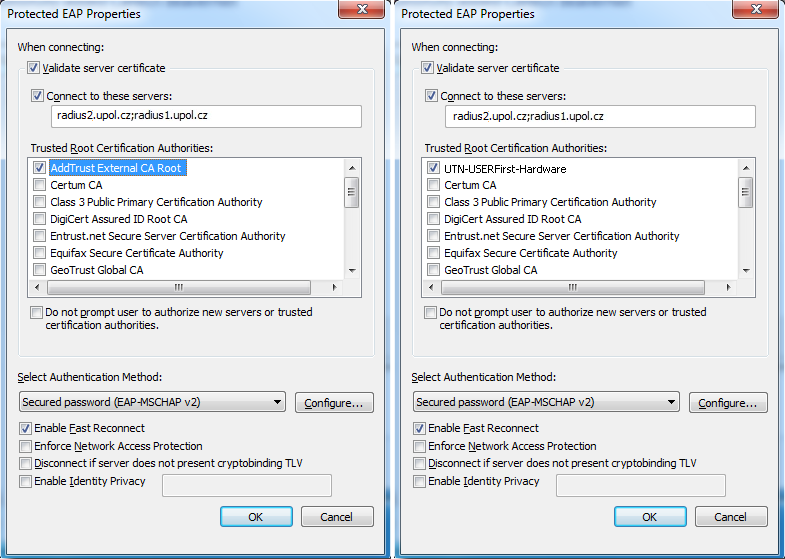
Step 8 - Certificate settings
Enable Validate server certificate option and then enable Connect to these servers and enter radius1.upol.cz;radius2.upol.cz into the box.
Then choose the AddTrust External CA Root or UTN-USERFirst-Hardware in Trusted Boot Certification Authorities. Once you have done this, click the Configure... button.
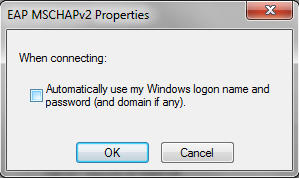
Step 9 - Disable the option
Disable Automatically use my Windows logon name and password (and domain if any).
Step 10 - Login setup
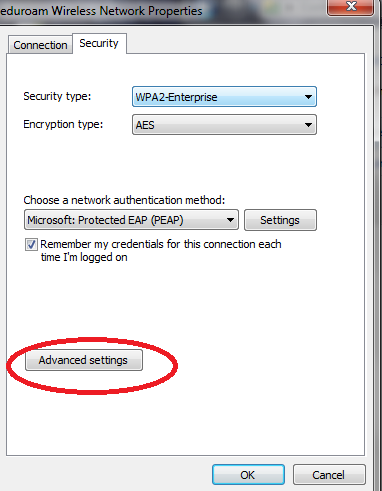
Now we are at the last part of the setup process. You have to setup your login and password to the WiFi. Click the Advanced settings button.
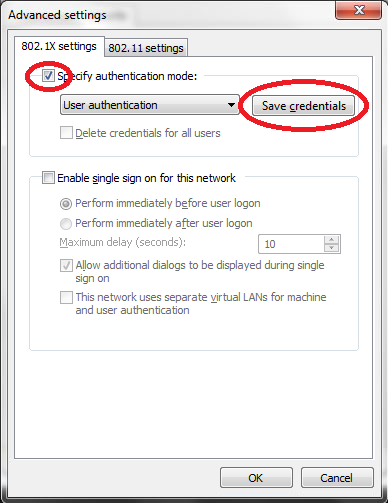
Check the Specify authentication mode and choose User Authentication.
Enter your login details in the window and then click the OK button.
Close all the opened windows by clicking the OK button. Now you should be connected to 'eduroam' university network. It was a piece of cake, wasn't it?
What should I do if I still have trouble connecting to the internet?
There is help available if you have issues with network connection.
