Pripojeni VPN na Mac OS X/en: Porovnání verzí
(Založena nová stránka s textem „Now we've set up everything we need to use the VPN network, just press ''Enable'' to save every setting. Now you are able connect to the VPN network.“) |
Bez shrnutí editace |
||
| (Není zobrazeno 93 mezilehlých verzí od 2 dalších uživatelů.) | |||
| Řádek 1: | Řádek 1: | ||
You can find all the basic | <languages /> | ||
You can find all the basic, necessary steps, which must be done before you can connect to UP VPN network, at page with '''[[Speciální:MyLanguage/Pristup k pocitacove siti|all the basic information regarding UP network.]]''' Please, continue only after finishing all the steps, or you will be unable to connect to the VPN properly. So, how to we set up the VPN? | |||
'''Before you set up a VPN connection, make sure that you have set up a password for VPN. Password to VPN or Eduroam is different one than a password to your Portal account. Follow the [[Speciální:MyLanguage/Navod_na_zmenu_hesla|password change manual here]].''' | |||
=== Step 1 - Preferences === | |||
Open ''Preferences'' in your ''Dock '' or ''Launchpad'' and click '''Network'''. | |||
[[File:Vpn osx en 01.png|center|575x480px|Vpn osx en 01.png]] | |||
=== Step 2 - Networks === | |||
Click the ''Add'' button '''+''' in lower left corner. | |||
[[File:Vpn osx en 02.png|center|575x480px|Vpn osx en 02.png]] | |||
=== Step 3 - VPN === | |||
Set up your new connection according to the following image and then click the ''Create'' button. | |||
[[File:Vpn osx en 03.png|center|575x480px|Vpn osx en 03.png]] | |||
Fill in | === Step 4 - Fill in information === | ||
[[ | Let's move on to the more difficult part of setting up the VPN network. Fill in the IP address <u>'''158.194.254.166'''</u> into the ''Server address'' box. Now enter your account name, which is your '''[[Speciální:MyLanguage/Portal UP|Portal ID]]'''. Click the '''Authentication Settings''' and enter your password. Then check ''Show VPN status in menu bar'', and click the ''Advanced...'' button. [[Navod_na_zmenu_hesla/en|('''For detailed password setup manual click here.''')]] | ||
[[File:Vpn osx en 04.png|center|575x480px|Vpn osx en 04.png]] | |||
Box for entering the passwordː | |||
[[File:Vpn osx en 05.png|center|575x480px|Vpn osx en 05.png]] | |||
=== Step 5 - Advanced settings === | |||
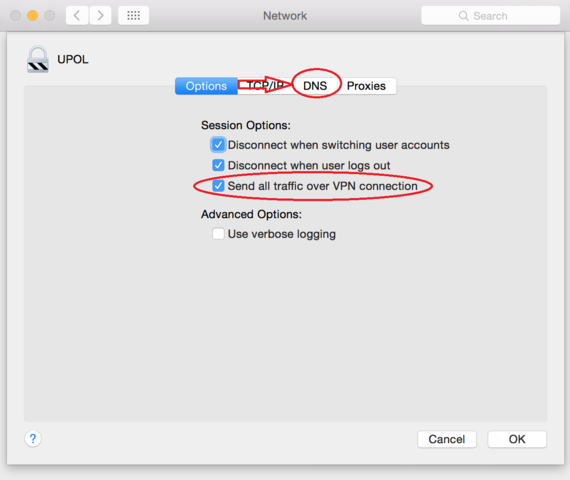
Check the option '''Send all traffic over VPN connection''' in the advanced options and then go to '''DNS''' tab. | |||
[[File:Vpn osx en 06.png|center|575x480px|Vpn osx en 06.png]] | |||
=== Step 6 - DNS === | |||
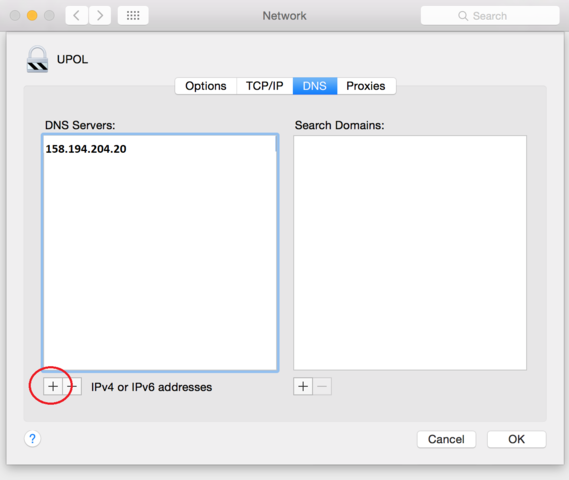
Click the ''Add'' button '''+''' in the lower left corner and enter the following IP address '''158.194.204.20'''. Then close the window by pressing ''OK''. | |||
[[File:Vpn osx en 07.png|center|575x480px|Vpn osx en 07.png]] | |||
=== Step 7 - Saving settings === | |||
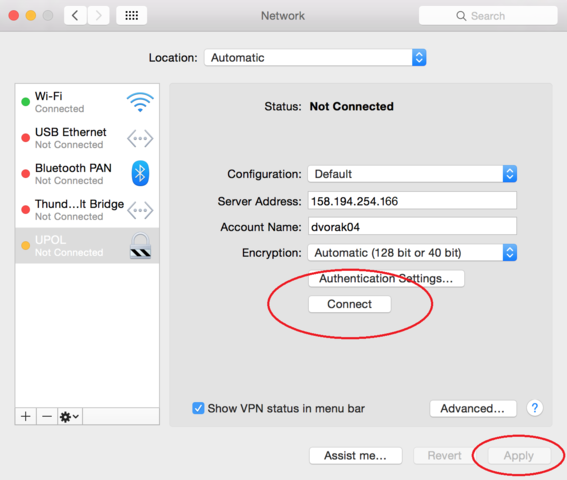
[[File:Vpn osx 08.png|center|575x480px|Vpn osx 08.png]] | Now we've set up everything we need to use the VPN network. Press '''Apply''' to save the settings. You can now ''connect'' to the VPN network. | ||
[[File:Vpn osx en 08.png|center|575x480px|Vpn osx en 08.png]] | |||
[[Category:Information Technology]] | |||
[[Category:Computer Network|Computer Network]][[Category:Manuals]] | |||
[[Category:Manuals for connecting to VPN]] | |||
Aktuální verze z 10. 12. 2021, 11:42
You can find all the basic, necessary steps, which must be done before you can connect to UP VPN network, at page with all the basic information regarding UP network. Please, continue only after finishing all the steps, or you will be unable to connect to the VPN properly. So, how to we set up the VPN?
Before you set up a VPN connection, make sure that you have set up a password for VPN. Password to VPN or Eduroam is different one than a password to your Portal account. Follow the password change manual here.
Step 1 - Preferences
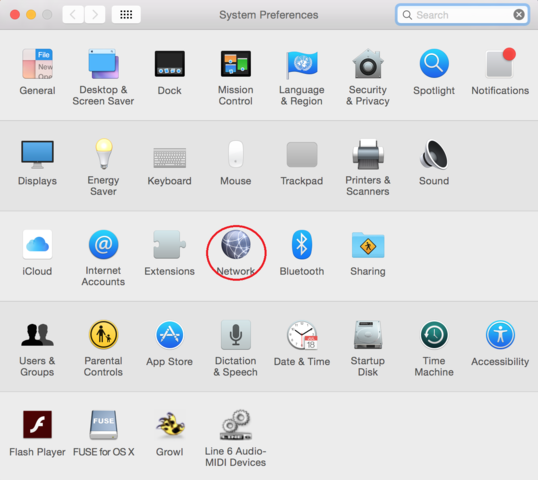
Open Preferences in your Dock or Launchpad and click Network.
Step 2 - Networks
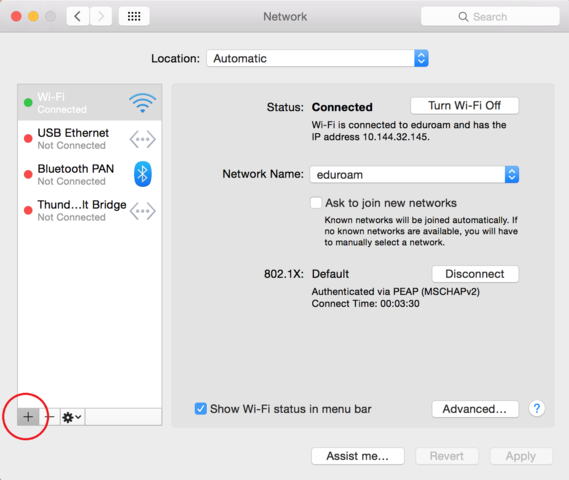
Click the Add button + in lower left corner.
Step 3 - VPN
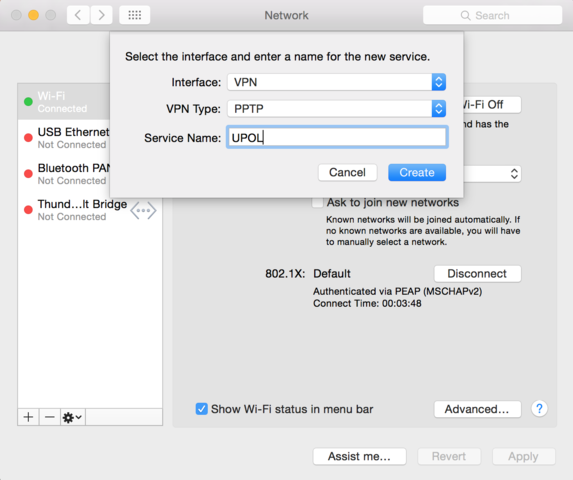
Set up your new connection according to the following image and then click the Create button.
Step 4 - Fill in information
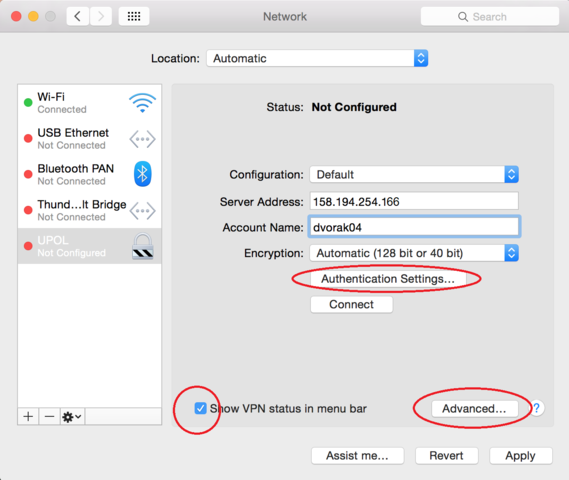
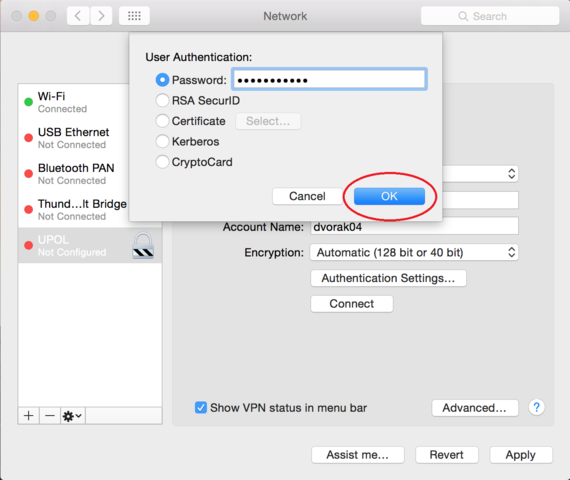
Let's move on to the more difficult part of setting up the VPN network. Fill in the IP address 158.194.254.166 into the Server address box. Now enter your account name, which is your Portal ID. Click the Authentication Settings and enter your password. Then check Show VPN status in menu bar, and click the Advanced... button. (For detailed password setup manual click here.)
Box for entering the passwordː
Step 5 - Advanced settings
Check the option Send all traffic over VPN connection in the advanced options and then go to DNS tab.
Step 6 - DNS
Click the Add button + in the lower left corner and enter the following IP address 158.194.204.20. Then close the window by pressing OK.
Step 7 - Saving settings
Now we've set up everything we need to use the VPN network. Press Apply to save the settings. You can now connect to the VPN network.
