Outlook 2013 pro zamestnance/en: Porovnání verzí
(Založena nová stránka s textem „=== Step 3 - Fill in information ===“) |
Bez shrnutí editace |
||
| (Není zobrazeno 54 mezilehlých verzí od stejného uživatele.) | |||
| Řádek 1: | Řádek 1: | ||
<languages | <languages /> | ||
In order to connect to our mail servers using '''Outlook 2013''' you have to use the Exchange protocol, which will set almost everything for you. Therefore, choose the Exchange account. | |||
== Automatic e-mail client setup == | == Automatic e-mail client setup == | ||
This following manual will show you how to add an e-mail account to Outlook 2013 automatically without any advanced setup of the client. | |||
=== Step 1 - Add account === | === Step 1 - Add an account === | ||
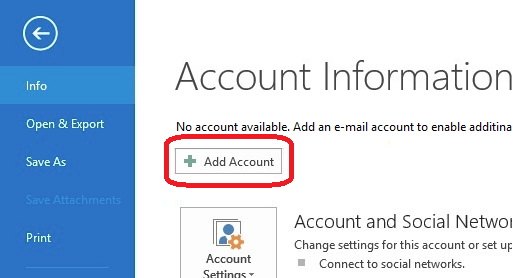
Click ''Information'' tab and choose ''Add account''. | Click the ''Information'' tab and choose ''Add account'' option. | ||
[[File:Outlook2013 zam 01.png|center|Outlook2013 zam 01.png]] | [[File:Outlook2013 zam en 01.png|center|Outlook2013 zam en 01.png]] | ||
=== Step 2 - Account setup === | === Step 2 - Account setup === | ||
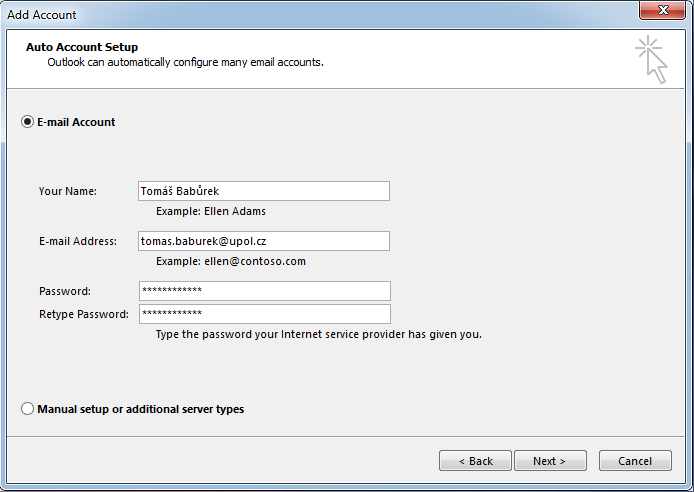
Choose | Choose the ''E-mail account'' option and enter your login details (your e-mail address should be in ''name.surname@upol.cz'' format). | ||
[[File:Outlook2013 zam 02.png|center|Outlook2013 zam 02.png]] | [[File:Outlook2013 zam en 02.png|center|Outlook2013 zam en 02.png]] | ||
=== Step 3 - Configuration === | === Step 3 - Configuration === | ||
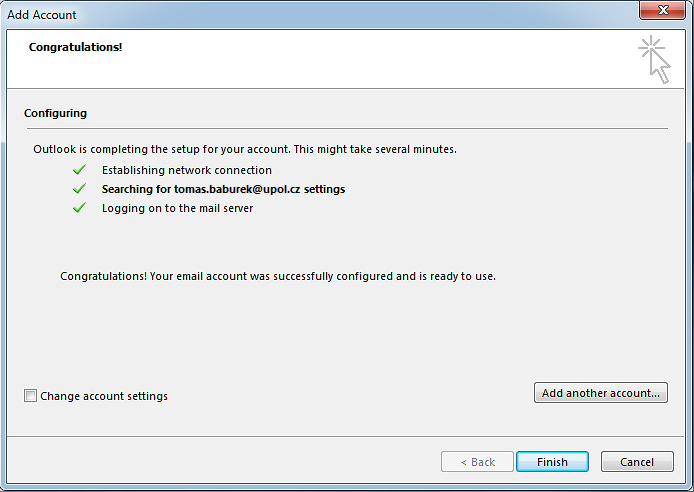
Everything should be set up | Everything should be set up automatically now. | ||
[[File:Outlook2013 zam 03.png|center|Outlook2013 zam 03.png]] | [[File:Outlook2013 zam en 03.png|center|Outlook2013 zam en 03.png]] | ||
=== Step 4 - First login === | === Step 4 - First login === | ||
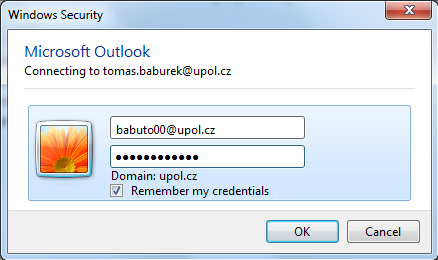
You need to restart you e-mail client after setup. | You need to restart you e-mail client after the setup. Furthermore, you might be asked to enter your login details again (login is PortalID@upol.cz). Please, check the option '''Remember my credentials'''. | ||
[[File:Outlook2013 zam 04.png|center|Outlook2013 zam 04.png]] | [[File:Outlook2013 zam en 04.png|center|Outlook2013 zam en 04.png]] | ||
== Manual e-mail client setup == | == Manual e-mail client setup == | ||
If you are unable to set your e-mail client up using the Exchange protocol, use IMAP protocol. | If you are unable to set your e-mail client up using the Exchange protocol, use the IMAP protocol. | ||
=== Step 1 - Choose manual setup === | === Step 1 - Choose manual setup === | ||
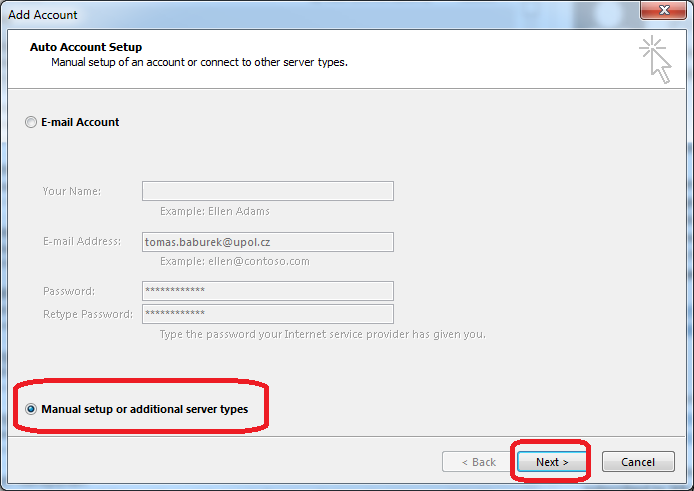
Choose '''Manual setup or additional server types''' in the main window of account setup. | |||
[[File:Outlook2013 zam 05.png|center|Outlook2013 zam 05.png]] | [[File:Outlook2013 zam en 05.png|center|Outlook2013 zam en 05.png]] | ||
=== Step 2 - Connection type === | === Step 2 - Connection type === | ||
| Řádek 44: | Řádek 44: | ||
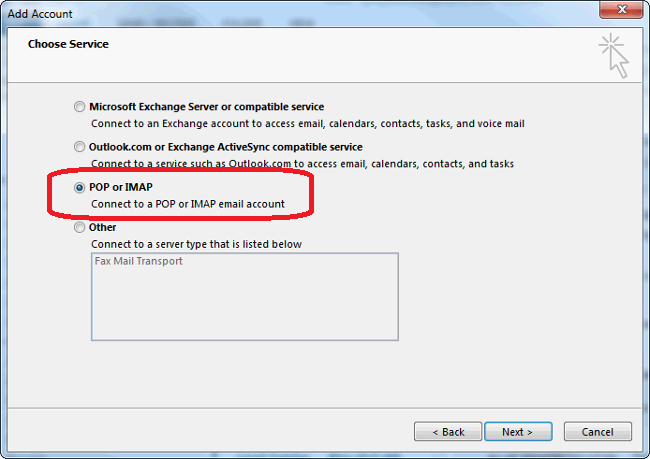
Choose '''POP or IMAP''' service and click the ''Next'' button. | Choose '''POP or IMAP''' service and click the ''Next'' button. | ||
[[File:Outlook2013 zam 06.png|center|Outlook2013 zam 06.png]] | [[File:Outlook2013 zam en 06.png|center|Outlook2013 zam en 06.png]] | ||
=== Step 3 - Fill in information === | === Step 3 - Fill in information === | ||
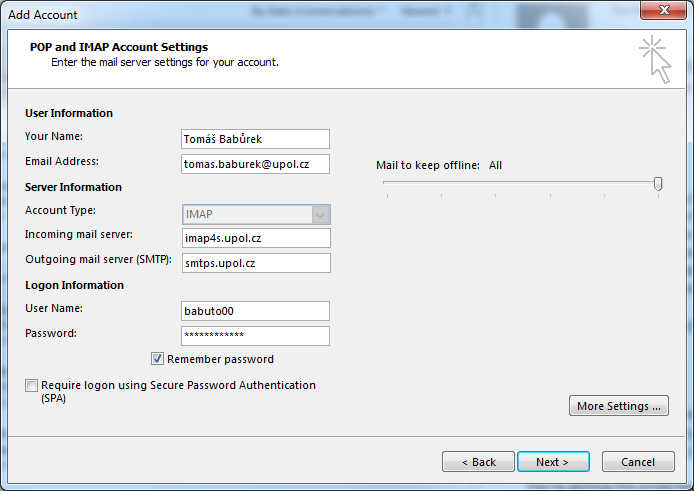
Now you have to fill in the following informationː your e-mail address in ''name.surname@upol.cz'' format, account type ''IMAP'', incoming mail server ''imap4s.upol.cz'', outgoing mail server ''smtps.upol.cz''. Furthermore, your user name is your '''Portal ID''' and your password is your e-mail account password. Then click the ''Next'' button. | |||
[[File:Outlook2013 zam 07.png|center|Outlook2013 zam 07.png]] | [[File:Outlook2013 zam en 07.png|center|Outlook2013 zam en 07.png]] | ||
=== | === Step 4 - Final mailbox test === | ||
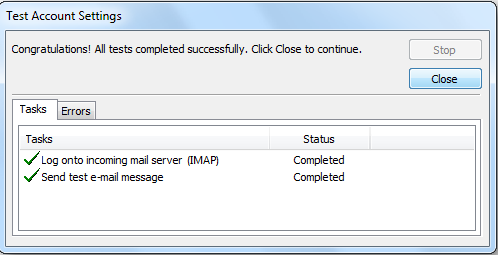
Your account will be tested whether you've set up everything correctly. If you managed to set everything up properly, close the window. Now you can fully use your e-mail account. | |||
[[File:Outlook2013 zam 08.png|center|Outlook2013 zam 08.png]] | [[File:Outlook2013 zam en 08.png|center|Outlook2013 zam en 08.png]] | ||
[[Category: | [[Category:Computer Network|Computer Network]][[Category:Manuals]][[Category:E-mail client setup manuals|E-mail client setup manuals]] | ||
Aktuální verze z 18. 1. 2018, 10:55
In order to connect to our mail servers using Outlook 2013 you have to use the Exchange protocol, which will set almost everything for you. Therefore, choose the Exchange account.
Automatic e-mail client setup
This following manual will show you how to add an e-mail account to Outlook 2013 automatically without any advanced setup of the client.
Step 1 - Add an account
Click the Information tab and choose Add account option.
Step 2 - Account setup
Choose the E-mail account option and enter your login details (your e-mail address should be in name.surname@upol.cz format).
Step 3 - Configuration
Everything should be set up automatically now.
Step 4 - First login
You need to restart you e-mail client after the setup. Furthermore, you might be asked to enter your login details again (login is PortalID@upol.cz). Please, check the option Remember my credentials.
Manual e-mail client setup
If you are unable to set your e-mail client up using the Exchange protocol, use the IMAP protocol.
Step 1 - Choose manual setup
Choose Manual setup or additional server types in the main window of account setup.
Step 2 - Connection type
Choose POP or IMAP service and click the Next button.
Step 3 - Fill in information
Now you have to fill in the following informationː your e-mail address in name.surname@upol.cz format, account type IMAP, incoming mail server imap4s.upol.cz, outgoing mail server smtps.upol.cz. Furthermore, your user name is your Portal ID and your password is your e-mail account password. Then click the Next button.
Step 4 - Final mailbox test
Your account will be tested whether you've set up everything correctly. If you managed to set everything up properly, close the window. Now you can fully use your e-mail account.
