Translations:WiFi Eduroam pro MS Windows 10/129/en: Porovnání verzí
Skočit na navigaci
Skočit na vyhledávání
Bez shrnutí editace |
Bez shrnutí editace |
||
| (Není zobrazena jedna mezilehlá verze od stejného uživatele.) | |||
| Řádek 5: | Řádek 5: | ||
[[File:win10_wifi_09_en.png|center|win10_wifi_09_en.png]] | [[File:win10_wifi_09_en.png|center|win10_wifi_09_en.png]] | ||
Check the ''Specify authentication mode'' and choose '''User Authentication'''. | |||
[[File:win10_wifi_10_en.png|center|win10_wifi_10_en.png]] | [[File:win10_wifi_10_en.png|center|win10_wifi_10_en.png]] | ||
Now enter your login details. | |||
[[File:win10_wifi_11_en.png|center|win10_wifi_11_en.png]] | [[File:win10_wifi_11_en.png|center|win10_wifi_11_en.png]] | ||
Close all the opened window tabs by pressing the OK button. Now you should be connected to ''eduroam'' university network. It was a piece of cake, wasn't it? | Close all the opened window tabs by pressing the OK button. Now you should be connected to ''eduroam'' university network. It was a piece of cake, wasn't it? | ||
Aktuální verze z 25. 1. 2016, 14:05
Step 7 - Login setup
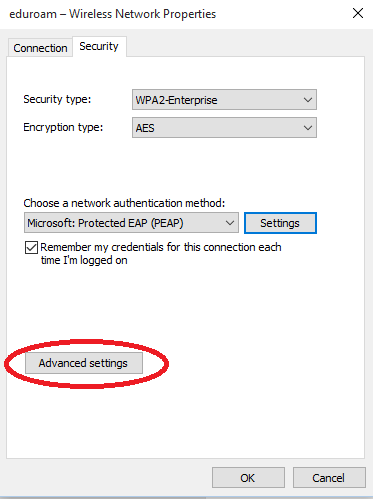
Now we are at the last part of the setup process. You have to setup your login and password to the WiFi. Click the Advanced settings button.
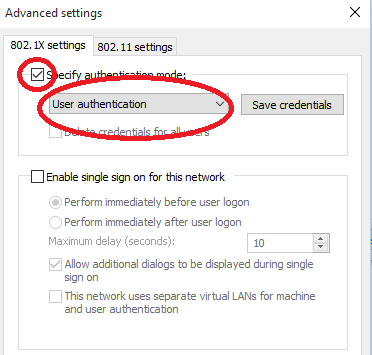
Check the Specify authentication mode and choose User Authentication.
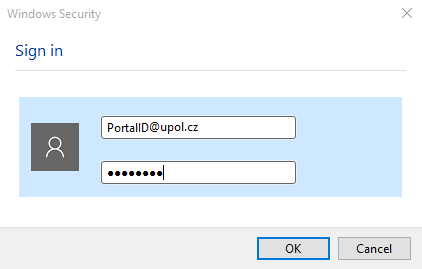
Now enter your login details.
Close all the opened window tabs by pressing the OK button. Now you should be connected to eduroam university network. It was a piece of cake, wasn't it?


